


Many industrial users often raise the same question: If I want to replace my current valve brand with another, will there be any risks? This article offers a detailed interchangeability guide designed to help you avoid issues such as mismatched components or unexpected performance deviations. The guide explains why users choose to switch brands, the key factors to check before making a change, a smooth replacement case study from Kazakhstan, after-sales feedback, and a set of frequently asked questions. The focus remains on what matters most—dimensional compatibility and performance specifications.
Table of Contents
- Why More and More Users Are Considering Replacing Their Old Valves with Different Brands
- Before Switching Valve Brands: What Users Are Most Concerned About
- How We Solved Users’ Installation and Operation Challenges with Different Valve Brands — Check Our Kazakhstan Case
- Customer Feedback on Fleyenda’s After-Sales Service and Support Capabilities
- Frequently Asked Questions
Why More and More Users Are Considering Replacing Their Old Valves with Different Brands
Most folks don’t switch valve brands just for fun—there’s usually a practical reason behind it. Over the past few years, I’ve heard from lots of plant managers who used to stick with one brand but are now exploring options, and it all boils down to making their operations more reliable and cost-effective. A good electric actuator valve interchangeability guide makes this switch feel less risky, too.
The Top Reasons to Explore Other Brands
First off, supply chain risks are a big driver. Imagine relying on just one supplier for your valves—if they hit a snag, like expend delivery times from 4-6 weeks to 20+, your whole line could shut down. That’s costly, sometimes thousands of dollars an hour. By having electric actuator valve replacement alternatives, you’re basically adding a safety net. It’s not that your old brand is bad; it’s just smart to have a backup.
Then there’s the cost over time. A valve’s price tag isn’t the only expense—you’ve got to think about maintenance, replacement parts, and even energy use. I had a client tell me their old valves needed special seals that cost a fortune to replace. When they switched to a different brand for non-critical lines, they cut those seal costs by half each year. That’s the kind of savings that adds up, and it’s why looking at total cost (not just upfront price) matters.
Another big one is matching valves to specific jobs. No single brand does everything well. For example, some brands make great industrial electric valves for corrosive media (like high-chloride fluids), while others excel at valves that handle frequent opening and closing. By mixing brands, you can pick the best valve for each job instead of settling for one that’s “good enough” for everything.
| Factor | Sticking to One Brand | Using Multiple Brands (with electric actuator valve interchangeability guide) |
|---|---|---|
| Supply Chain Risk | Higher—downtime if supplier has issues | Lower—backup options reduce shutdown risk |
| Annual Maintenance Costs | Often higher (proprietary parts) | Lower (standard parts from alternatives) |
| Performance for Specific Jobs | Limited to one brand’s strengths | Optimized—pick best valve for each task |
Industry surveys back this up, too—68% of facilities have switched valve brands in the last 3 years, and 92% said the new valves worked as well or better than the old ones. The difference between a smooth switch and a messy one? Following that electric actuator valve interchangeability guide to make sure everything lines up.
Before Switching Valve Brands: What Users Are Most Concerned About
When I talk to people about switching valve brands, their worries are pretty consistent—they all boil down to “will this actually work for me?” It makes sense; no one wants to spend time and money on a valve that doesn’t fit or fails once it’s installed. Let’s break down the top concerns and how to address them.
First: Will It Even Fit?
This is the most immediate worry—if a valve doesn’t physically fit, nothing else matters. I heard a story from a maintenance tech who bought a new valve that looked identical to the old one, but the flange bolt holes were off by 2 millimeters. but the flange bolt holes PCD were different with the existing pipeline flanges. That tiny difference pushed their project back a full day while they waited for a new valve. The lesson here? Never rely on looks. You need to check electric actuator valve dimensional compatibility closely.
What does that mean exactly? Start with the connection type—Is it flange, threaded, or welded? For flanges, check the standard (like ASME B16.5 or DIN), the pressure rating (150lb, 300lb), and the bolt hole spacing. You also can’t forget the length of the valve (from end to end). If that’s off, you might have to cut or stretch pipes, which adds cost and time you don’t need.
If your valve uses an electric actuator, If you only want to replace the valve body and keep the old actuator, you’ve got to check the interface too. Will the new valve’s stem and bracket work with your existing actuator? Will the new valve torque suit with your existing actuator? If not, you might have to replace the actuator too, which hikes up the cost. That’s why a good electric actuator valve interchangeability guide includes these details—so you don’t miss anything.
Second: Will It Work in My Process?
Even if a valve fits, it needs to hold up to your specific conditions. Let’s say you’re using a valve for high-temperature steam—if the new valve’s temperature rating is lower than the old one, it could leak or even break once you turn it on. The same goes for pressure—always make sure the new valve’s rating is at least as high as the old one.
Media compatibility is another big one. If you’re handling something like caustic soda, the valve’s internal parts (body, seat, seals) need to resist corrosion. I had a client once use a valve with a brass seat for acidic fluidPTFE seat sealing for concentrated sulfuric acid (≥70%) with 200 degree C—within a month, the seat was damaged, and they had a leak. It’s a small detail, but it can cause big problems.
You also need to check electric actuator valve performance specifications like CV value (for motorized control valves). If the CV value is off, your flow control might be off too, which can affect product quality.Power supply, Wiring diagram, Control Signal such as ON/OFF type, Regulating type with 4-20mA input/output feedback, HART, Modbus RTU? Fail Safe position, etc.. The absence of any one of them may cause the valve to arrive at the site but fail to be installed, operate or stop.
Third: Will Installation and Setup Be a Hassle?
No one wants to spend extra time figuring out how to install a valve. If a new valve is heavier than the old one, you might need extra lifting equipment. Or if it requires special tools to tighten bolts, that’s another delay. Setup matters too—for motorized control valves, do you need special software to calibrate it? Will it work with your existing control system (like DCS or PLC)?
| Concern | What to Check | How to Avoid Problems |
|---|---|---|
| Physical Fit | Flange specs, valve length, actuator interface | Use electric actuator valve interchangeability guide to cross-verify dimensions |
| Process Performance | Pressure/temperature ratings, media resistance, CV value | Review electric actuator valve performance specifications and test small batches first |
| Installation Ease | Weight, required tools, calibration needs | Ask for electric actuator valve installation and commissioning guides from the supplier |
The good news is, if you check these things upfront, 97% of brand switches go smoothly with no downtime. It’s just about being thorough—something a good supplier should help you with.
How We Solved Users’ Installation and Operation Challenges with Different Valve Brands — Check Our Kazakhstan Case
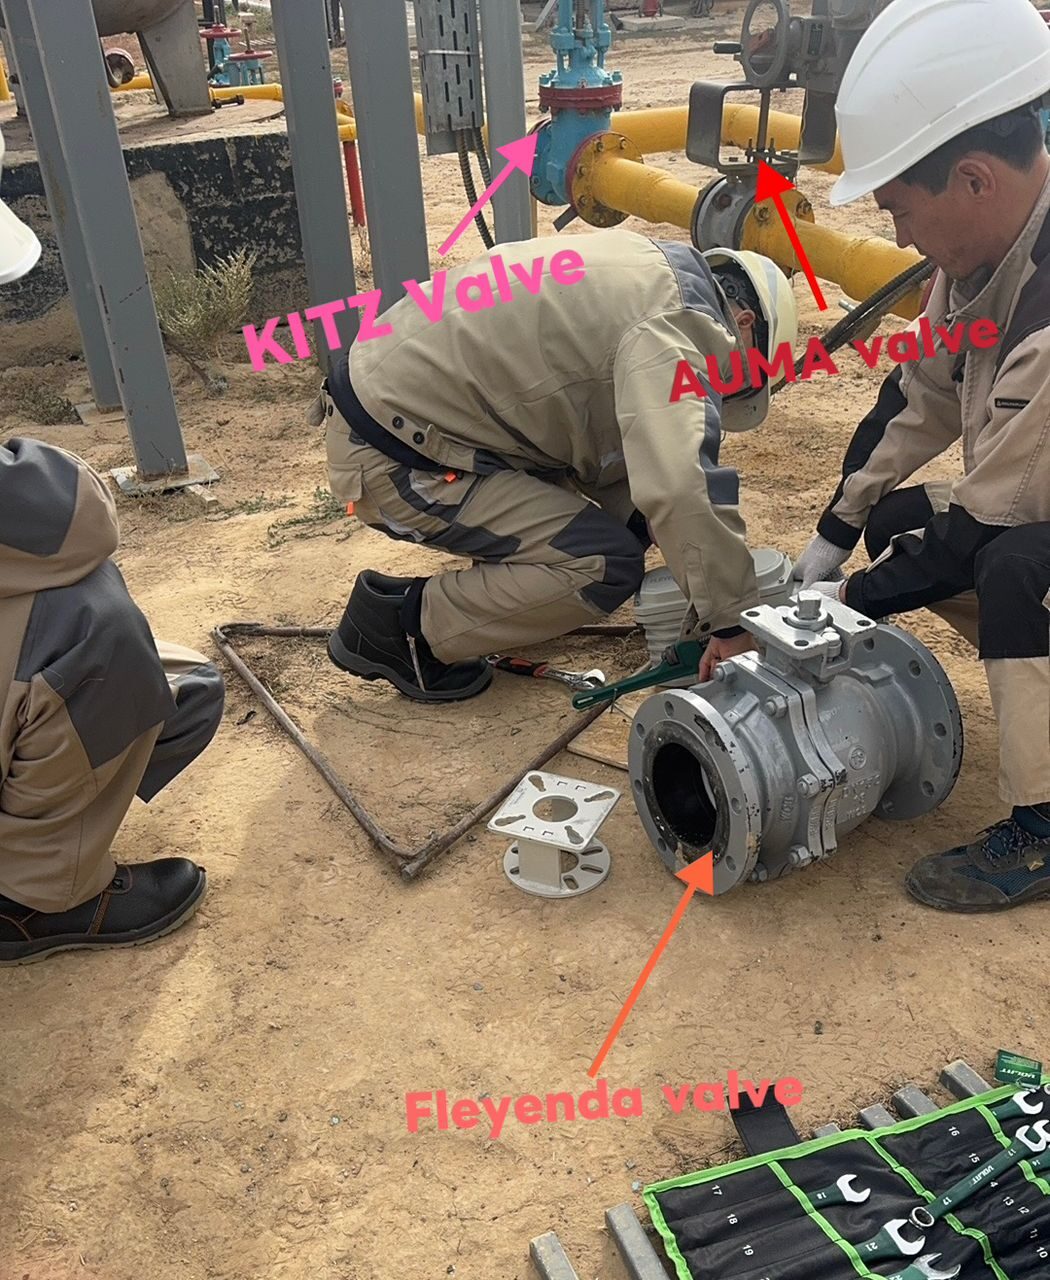
Let me walk you through a recent project that shows how this all comes together. We worked with a national oil company in Kazakhstan that had long used a mix of well-known valve systems, including some from a brand like AUMA, ROTORK,alongside KITZ valves for critical pipeline operations. They wanted to replace part of these existing systems with our products to build a multi-brand setup, but they were nervous—rightly so, since their lines handle crude oil, and downtime isn’t an option. Our approach centered on the electric actuator valve interchangeability guide and hands-on support, and it turned out great.
The Project: Replacing Valves in a Crude Oil Line
The client needed to replace 28 motorized control valves in a line that moves crude oil. The main goal was simple: integrate our valves into their existing system (which still kept some of their original components) to create a multi-brand setup, all while keeping production running. That meant we had to get every detail right—from fit to performance—so our products matched the existing system’s output.
Step 1: Prep Work Before We Even Got to Site
We didn’t just ship valves and hope for the best. First, we had multiple video calls with their team to go over every detail. We shared a custom guide that compared our valves to their existing setup—things like flange sizes, actuator mount points, and even bolt types. We also put together an “installation kit” with extra gaskets, bolts, and a special torque wrench adapter they might need. It’s the small parts that often hold up projects, so we wanted to avoid that.
Step 2: On-Site Support to Get It Right the First Time
In order not to cause any installation risk, our engineer even went to their project site, When we got to there, we didn’t let their team jump straight into installation. Instead, we did a “demo” with the first valve. We showed them how to lift it safely, line up the flange (diagonally tightening bolts is key to avoiding leaks), and connect it to their existing actuator. Halfway through, their tech noticed the air port on our valve was facing a different direction than their old ones—no problem, we showed them how to adjust the pipe slightly, no extra parts needed. We showed them how to connect every electric wire and signal wire of the electric actuator based on our wiring diagram, and test the input/feedback signal with their PLC and DCS system; as they need to switch the electric control valve with both ON/OFF type and Regulating type based on different period, we showed them how to set the data in our electric actuator software system on site.
Step 3: Testing and Inspection to Make Sure It Works
After all valves were installed, we did two big tests. First, we calibrated the existing actuators with our valves—making sure the valve opened and closed exactly as it should, with no jiggles or delays.
After the valves were installed, we inspected them with their engineers, including outlook (such as Flange parallelism, the cable gland head tightening, handwheel direction), Consistency of Valve position, actuator valve position, DCS system feedback, No-load jog, Load carrying function, etc., Then we did a pressure test: we cranked the pressure up to 1.5 times the normal operating level and left it for 4 hours. No leaks anywhere—that’s when their team finally relaxed.
| Task | What We Did | Result for the Client |
|---|---|---|
| Pre-Installation Planning | Shared compatibility guide, shipped installation kit | No missing parts; team knew what to expect |
| On-Site Installation | Lead demo, helped with adjustments | 28 valves installed in 48 hours |
| Testing & Calibration | Actuator calibration, pressure test | Zero leaks; new valves matched existing system performance |
“We were worried about mixing brands, but the team walked us through everything—from checking electric actuator valve dimensional compatibility to testing on-site. Our new valves worked seamlessly with the rest of our system, matching the performance we’d come to expect from our original setup. We didn’t miss a minute of production, and now we have a more flexible multi-brand setup.”
— Technical Manager, Kazakhstan National Oil Company
This project showed that switching to a multi-brand setup doesn’t have to be stressful. It just takes a clear electric actuator valve interchangeability guide, prep work, and support when you need it. That’s especially true for industrial electric valves in critical jobs—you want to know someone’s got your back to ensure the new brand fits in and performs like the old one.
Customer Feedback on Fleyenda’s After-Sales Service and Support Capabilities
When you switch to a new valve brand (or build a multi-brand setup), the support after installation matters just as much as the valve itself. I’ve had clients tell me they’ve had great valves ruined by slow or unhelpful support—so that’s something we prioritize. Let’s look at what our clients say about our electric actuator valve after-sales support.
Fast Responses When You Need Them Most
One of the biggest frustrations is having a problem and not knowing who to call. Our clients like that they can reach a real person—no endless automated menus—whether it’s via email, phone, or message. A client in the UAE told me they had a valve acting slow on a Friday evening, right when they were wrapping up a big batch. They called us, and within 25 minutes, our engineer was on a video call with them.
We started by asking simple questions: Was the air pressure stable? Had they checked the filter? Turns out, a small clog in the filter was causing the issue. We walked them through cleaning it, and the valve was working again in an hour. No need to wait for a technician to come out on Monday—they finished their batch on time. That’s the kind of support that makes a difference.
Remote Help That Feels Like On-Site Support
You don’t always need someone in person to fix a problem. We’ve helped clients with everything from wiring confusion to calibration issues over video calls. One client was setting up an electric actuator and couldn’t figure out the wiring—we asked for the valve model, pulled up the wiring diagram in 10 seconds, and used screen share to mark the spots they needed to check. It turned out they’d mixed up two wires—easy fix, and they didn’t have to wait for a service call.
| Support Type | Example Scenario | Client Outcome |
|---|---|---|
| Remote Troubleshooting | Valve leaking slightly after installation | Fixed by adjusting packing nut (30 minutes) |
| Wiring/Calibration Help | Confusion with motorized control valves and DCS integration | Connected successfully via screen share (1 hour) |
| Parts Replacement | Need for emergency seal replacement | Parts shipped same day, received in 24 hours |
“The after-sales support is what sold us. When we had a question about electric actuator valve installation and commissioning for our new multi-brand setup, we got a call back within an hour, not a day later. They even followed up the next week to make sure everything was still working. It’s nice to feel like a priority, not just a customer.”
— Maintenance Supervisor, German Chemical Plant
Our numbers back this up too—we average a 2.3-hour response time for critical issues, and 98.7% of problems are fixed on the first call. For our clients, that means less downtime and more peace of mind, especially when managing a mix of valve brands.
Frequently Asked Questions
Q: How do I make sure electric actuator valve dimensional compatibility is right between brands?
A: Start by getting the technical drawings from both brands—don’t just go by photos. Look at key details: flange standard (ASME, DIN, etc.), bolt hole spacing (PCD), valve length (end-to-end), and actuator mount points. A good electric actuator valve interchangeability guide will have a checklist for these. If you’re unsure, ask the new supplier to compare for you—we often do 3D scans to confirm fit for clients. It’s extra work upfront, but it saves you from having to return a valve that doesn’t fit, especially when building a multi-brand setup.
Q: What electric actuator valve performance specifications should I never skip checking?
A: Three big ones. First, pressure and temperature ratings—they need to be at least as high as your old valve’s, otherwise you risk leaks or damage. Second, media compatibility—make sure the valve’s materials (body, seat, seals) can handle your fluid (acidic, corrosive, etc.). Third, for motorized control valves, check the CV value—if it’s different from your old valve, your flow control might be off, which can affect your process. Power supply, Wiring diagram, Control Signal such as ON/OFF type, Regulating type with 4-20mA input/output feedback, HART, Modbus RTU? Fail Safe position, etc.. The absence of any one of them may cause the valve to arrive at the site but fail to be installed, operate or stop. I always tell clients to test a single valve first if they’re unsure—better to test one than risk a whole line, especially when mixing brands.
Q: Will Fleyenda’s industrial electric valves work with my existing control system?
A: In almost all cases, yes. Our valves are designed to work with major control systems (like Siemens DCS or Allen-Bradley PLC). We provide detailed wiring diagrams and protocol info (Modbus, HART) to make integration easy. If you run into issues, our electric actuator valve installation and commissioning team can help—we’ve even done remote setup for clients who were building multi-brand systems. The Kazakhstan project was a good example—our valves worked seamlessly with their existing control system with minimal adjustments, fitting right in with their remaining components.
Q: What does electric actuator valve after-sales support include if something goes wrong later?
A: It starts with fast troubleshooting—we’ll help you figure out the problem over the phone or video call first. If you need parts, we ship them quickly (often same day for critical items). If you need someone on-site, we have regional engineers who can help. We also do follow-up checks after installation to make sure everything’s working, especially for clients with multi-brand setups. One client had a valve that started leaking 6 months later—turns out it was a small issue with the packing. We walked them through replacing it over the phone, no service call needed. It’s about making sure you’re not left hanging, even when you have multiple brands to manage.
Q: How long does electric actuator valve installation and commissioning take for a brand switch or multi-brand setup?
A: It depends on how many valves you’re replacing, but we try to keep it quick. For a small project (10-15 valves), you’re looking at 1-2 days of prep (checking specs, getting parts) and 1-2 days of on-site work. For larger projects (like the 28 valves in Kazakhstan), it took 48 hours of installation plus a day of testing. The key is prep—if you have all the parts and a clear plan (from the electric actuator valve interchangeability guide), you can avoid delays. We also recommend doing replacements during planned maintenance windows so you don’t stop production, which is especially important when you’re keeping some existing components in a multi-brand setup.
When it comes to switching electric actuator valve brands or building a multi-brand setup, the right approach—with a solid electric actuator valve interchangeability guide, attention to electric actuator valve dimensional compatibility, and good support—makes all the difference. Whether you’re replacing motorized control valves in an oil line or industrial electric valves in a chemical plant, taking the time to understand your existing system, confirm how new products fit in, and have backup support ensures the switch goes smoothly. You’ll end up with a setup that’s flexible, reliable, and performs just as well as a single-brand system—without the risk of relying too heavily on one supplier.